
Get started quickly with your PRO insoles
Step 1: Fully charge the insoles
Connect the charger to the insoles and plug it into the power socket.
- While charging, the blue light on the sole flashes.
- After about 3 hours, the soles are fully charged and the blue light is on continuously.
- Before charging, check that the soles are completely off and not in standby mode.
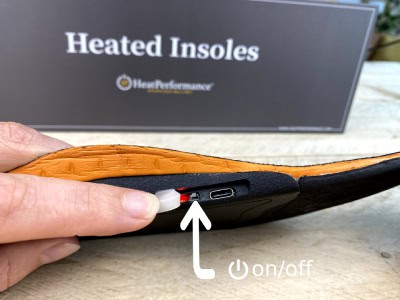
Step 2: Switch on the insoles
Press and hold the button on the side of the soleplate for about 3 seconds to turn the insole on. The light on the insole will then illuminate in the color of the last heat setting selected: red, orange or green.
Step 3: Choose the desired heat setting
After switching on, briefly press the button on the insole to switch between the 3 heat settings:
- Red = high setting
- Orange = medium setting
- Green = low setting

Step 4: Use the remote control
The remote control has 4 buttons:
- L = low setting
- L = medium setting
- H = high position
- On/Off = switch off system / standby mode
The insoles and remote control are normally already paired when you receive them.
Please note that if the soles are completely turned off, you cannot turn them on with the remote control for safety reasons. In that case, switch the insole on manually first via the button on the insole.

Pair the remote control again
Normally, when you receive your heated insoles, the remote control is already paired.
Is the remote no longer responding? Then follow the steps below to re-pair.
- First, switch on the insole completely.
- Then press the button on the insole 3 times in quick succession.
- The LED will then flash red, orange and green.
- Then press any button on the remote control to complete the pairing process.
- You can also press the insole button once more to exit reset mode.

Troubleshooting
Is one of the soles or the remote control not working properly? Find out below what could be causing it and what you can do yourself.
The insole does not switch on
- Fully charge the insoles and try again.
- Press and hold the button on the insole for about 3 seconds to switch the insole on manually.
The remote control does not respond
- Check that when a button on the remote control is pressed, a blue light illuminates briefly.
- If this light does not illuminate, replace the remote control battery.
- First switch on the insole manually using the button on the insole.
- If the remote still does not work after that, follow the reset and pairing procedure above.
Red flashing light on the sole shortly after turning on
- The battery of the insole is almost empty. Recharge the insoles immediately.
The insole does switch on, but turns off again quickly
- Fully charge the insoles before using them again.
One insole works properly and the other does not
- Fully charge both insoles and test them again.
- Does one insole still respond clearly differently? Then contact us.
General information
LED indicators
- Red = high heat setting
- Orange = medium heating mode
- Green = low heating mode
- Blue flashing = charging in progress
- Blue continuous = fully charged
- Red flashing shortly after power on = battery low
- Red, orange and green flashing = pairing mode active
Fully switched off or standby
The PRO insoles can be switched off in two ways:
Fully switch off using the button on the insole
Press and hold the button on the side of the insole for about 3 seconds. The red light will then blink briefly. After that, the insole is completely switched off. In this mode, the insole no longer responds to the remote control.
Switch off using the remote control
When you switch off the insole using the on/off button on the remote control, the insole goes into standby mode. In standby mode, the insole can later be switched on again with the remote control.
Important:
- If the insole has been fully switched off using the button on the insole, the remote control will no longer work.
- In that case, first switch the insole on again manually using the button on the insole.
- Do not store the insoles in standby mode when you are not using them.
Before first use
- Fully charge both insoles before first use.
- Check that both insoles function properly before using them or trimming them to size.
- Always test both insoles briefly before placing them in your shoes.
- Only trim the insoles to size after checking that both insoles work properly.
- Trim the insoles only along the official cutting lines on the underside of the insole.
- Never cut beyond the smallest size marking on the underside of the insole.
- Cutting beyond this point may damage the heating system.
Heating area
The heating element warms the front part of the foot, including the toes.
Safety instructions
For your safety, it is important to follow the instructions below carefully.
General
- Do not use the product if it is damaged, wet or not functioning properly.
- Do not use the product if the outer layer, lining, connection or electronics are damaged.
- Check the insoles for visible damage or other irregularities before each use.
- Use the insoles only as heated insoles in suitable footwear.
- Use the insoles only in properly fitting shoes.
- Do not use the insoles if they are too tight or restrict blood circulation.
- Do not use the insoles on feet with wounds, damaged skin, swelling or pressure spots.
- Do not open or disassemble the product and do not make any modifications to the insoles, electronics or wiring.
- Not suitable for use by children.
Charging and battery use
- Use only the charger supplied or recommended by HeatPerformance®.
- Only charge at room temperature and under supervision.
- Disconnect the charger as soon as charging is complete.
- Do not charge near flammable materials such as paper, textiles or bedding.
- Never open, puncture, crush or burn the battery.
- Do not use or recharge a damaged product.
- Do not expose the insoles to fire, extreme heat or moisture.
During use
- Do not use the insoles with wet or damp feet.
- Do not switch on the insoles when they are still wet.
- Do not use the insoles while sleeping.
- Use with extra caution in cases of reduced sensitivity to heat or circulatory problems.
- Extra caution is required for elderly and for persons with reduced skin or nerve sensitivity.
- When in doubt before use, consult a doctor, for example in pregnancy, diabetes, circulatory problems or reduced heat sensitivity.
- Turn off the product immediately if it feels uncomfortably hot.
Cleaning and maintenance
- Do not wash or soak insoles to prevent short circuits.
- Never immerse the insoles in water.
- Wipe the insoles only with a slightly damp cloth.
- Allow the insoles to dry completely before reuse.
Storage
- Store the insoles in a cool, dry place.
- Do not store or use the product in high-temperature environments.
- Never store insoles in standby mode when not using them for long periods of time.
- For long-term storage, charge the insoles at least once every 3 months to maintain battery condition.
In emergencies
- Stop using the product immediately if there is a burning smell, smoke, excessive heat or unusual noises.
- Do not touch an overheated product.
- Dispose of damaged insoles according to applicable local regulations.
- Contact the supplier if you have any doubts about the safety of the product.
Environment and recycling
- Do not dispose of the insoles in household waste.
- The built-in battery and electronic components must be disposed of according to locally applicable laws and regulations.
- If possible, return the product to an official collection point for electrical appliances or batteries.
Warranty
- The heated insoles are covered by a 12-month warranty from the date of purchase under normal and proper use.
- Damage resulting from misuse, improper charging, improper cleaning, normal wear and tear, modifications to the product or use contrary to this manual is not covered by the warranty.
- Insoles cut to size cannot be returned.
- Damage caused by cutting outside the specified cutting lines is not covered by the warranty.
- If a defect covered by the warranty occurs after cutting within the permitted cutting lines, we will assess whether repair or replacement is possible.